In today's modern app development, Firebase is a powerful Backend-as-a-Service (BaaS) platform maintained by Google. If you are a Flutter developer, Firebase provides you with Authentication, Realtime Database, Cloud Firestore, Cloud Messaging, Storage, Analytics, and many more tools that make your app functional in the real-world.
In this blog, we will see a step-by-step guide on how you can connect your Flutter app to Firebase (for Android). This guide is for absolute beginners and each step is explained in detail.
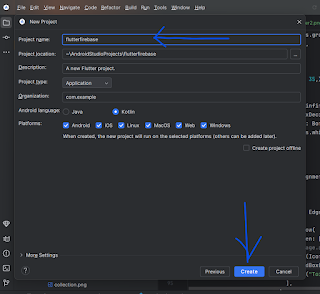
Step 1: Create Flutter Project
Android Studio
- Enter the project in your IDE Android Studio: Click the "File" menu. Click "Open". Browse to the flutter_project build material you just saw and click "Open".
VS Code
Click the "File" menu. Click "Open Folder...".
Browse to the flutter_project directory you created and click "Select Folder".
- Click “Add Project” on the Firebase console.
- Name your project (eg. flutterfirebase) and click “Continue”.
- Enable/disable Google Analytics options (optional), then click on “Create project”. Firebase will create your project – it will take a few seconds.
Step 3: Register Android App in Firebase
- In the Firebase dashboard, click on "Add App" (select Android icon).
- Enter the Android package name of your Flutter app. You will find this in the android/app/src/main/androidManifest.xml file, for example:
- App nickname and SHA-1 fingerprint is optional. & Click on “Register App”.
Step 4: Add the google-services.json file
- The Firebase will ask you to download a google-services.json file – download it.
- Paste this file inside the android/app folder of your Flutter project.
Step 5: Android-Level Configuration
A. Changes in android/build.gradle:
android/build.gradle
        buildscript {
    dependencies {
        classpath 'com.google.gms:google-services:4.3.15'
    }
}
android/app/build.gradle
        apply plugin: 'com.google.gms.google-services'

dependencies {
    implementation platform('com.google.firebase:firebase-bom:32.3.1')
    implementation 'com.google.firebase:firebase-analytics'
}
pubspec.yaml
        dependencies:
  flutter:
    sdk: flutter
  firebase_core: ^2.24.2
  firebase_analytics: ^10.8.3
main.dart
Step 8: App Run :
       import 'package:flutter/material.dart';
import 'package:firebase_core/firebase_core.dart';

void main() async {
  WidgetsFlutterBinding.ensureInitialized();
  await Firebase.initializeApp();
  runApp(MyApp());
}

class MyApp extends StatelessWidget {
  @override
  Widget build(BuildContext context) {
    return MaterialApp(
      title: 'Firebase Connected App',
      home: Scaffold(
        appBar: AppBar(title: Text('Firebase Setup Done')),
        body: Center(child: Text('Hello Firebase!')),
      ),
    );
  }
}
Now your Flutter app is configured for Android with Firebase. If everything is set up correctly, the app will run successfully without any error. You can also confirm by checking the Analytics dashboard or Realtime Database in the Firebase Console.
Firebase features you can integrate:
- Firebase Authentication (Email, Google, Facebook login)
- Cloud Firestore OR Realtime Database
- Firebase Cloud Messaging (Push Notifications)
- Firebase Storage (File uploads)
- Firebase Analytics
- Crashlytics (Error tracking)
Conclusion :
You have successfully connected your Flutter app with Firebase for Android platform. Now you can make your app smarter, secure, and more powerful by using every feature of Firebase. If you like this blog, do share it and don't forget to give your feedback in the comments.


0 Comments